Unpacking Temperature and Humidity Sensor Pro from Xiaomi, to use in the bathroom.
- ToadDe

- May 30, 2021
- 6 min read
Updated: Oct 6, 2022
The product to introduce this time is Xiaomi's Temperature and Humidity Sensor Pro.
This product has almost the same function as the Xiaomi Temperature and Humidity Sensor 2 that I posted earlier.
However, in addition to the temperature and humidity sensor function, I needed a product that can check the time, so I bought it together.
This product seems to be a suitable product if you want to put a watch in the bathroom, but it is not enough to put only the watch.
The function is similar, but there is a slight difference from the Sensor2 product. You can check the details in the contents below.
box exterior
The box has a picture of the product on the front, similar to Sensor 2, the Xiaomi logo on the upper right, and the product name in Chinese and English on the lower left.

On the back of the box, there are product names, specifications, and various certification marks.
And at the top there is a part for opening the box.

On the upper and lower sides of the product, the functions of the product are marked with icons and in Chinese and English.

open box
The box can be opened by tearing off the upper part of the back.

After opening the box, put the bottom of the box up,

The product can be removed by lifting the inner cover upwards.
The product is wrapped inside with soft plastic.

Components
I tried to list all the components I took out of the box.
The components include the product body, manual, and 3 types of parts for product installation.
Unlike the method that only attaches to the wall using double-sided tape, Sensor 2 can be installed in various ways in the location for installation.
It can be installed in a place such as a refrigerator or a nightstand by using double-sided tape, a stand, and a magnet.

The manual is in the form of a booklet, so it is easy to read and store the manual.
(Of course, after installing it, I don't think I'll ever see it again.. 😅)
The manual is written in both Chinese and English.
The manual includes instructions on how to install and a QR code with a URL to install the Mi Home app.


Appearance
Compared to the Sensor 2, it has a more luxurious design.

This is the sensor viewed from the front.
If you've seen the previous post, you might be able to spot the difference. Can you see it?
In addition to the time displayed, the liquid crystal is different from Sensor2.
Sensor 2 has a solid color liquid crystal display, while Sensor Pro has an E-Ink display.
That's why it seems like it's supposed to use 2 batteries.

On the back side, there is an engraved place to attach the double-sided sticker for product attachment.
And on the lower side, there is a groove for opening the product cover.

Specifications
The width of the product was measured to be 110mm.

The top and bottom length of the product was measured to be 54.9mm.

I didn't take a picture of the thickness of the product, but the thickness was measured to be about 9.6mm.
Compared to Sensor 2, it has a thickness of about 3mm.
The weight of the product is about 61g. Compared to Sensor 2, which weighs about 21g, it is about 3 times heavier

Reviews
In order to use the product, the attached film must be removed to discharge the battery.
To remove the film, you need to open the cover on the back, starting with the groove on the bottom side, insert your fingernail and pull it up, then rotate the side to open the cover.

Open the cover and you will see two CR 2032 batteries in the back.
If you look at the top of the back, you can see that there is an external hole for the sensor used for temperature and humidity measurement, similar to Sensor 2.
In any case, remove the film attached to the battery and cover the back cover, and the basic process for using the sensor is complete. After that, if you connect the smartphone through the Mi Home app, the installation process is completed.

As with the Xiaomi Temperature and Humidity Sensor 2, to prevent the battery from being discharged, the tape must be removed before connecting to the Mi Home.
It has a function that displays the time differently from Sensor 2, but if you do not synchronize it with your smartphone, it does not match the current time, so synchronization is essential.
To synchronize with the smartphone, enter the Mi Home app, press the + button in the upper right corner, select the sensor category on the screen to select the add product list, and select the icon in row 3, column 1, or select a smart phone near the product. The product search proceeds through Bluetooth connection while the phone is in place, and if you select the searched product from the top, the connection process proceeds.
With the sensor near your smartphone, select the product when it appears in the list.
After that, the process of connecting with the smartphone is carried out, and when the connection is complete, the process of selecting the installation location of the product is carried out. (The installation location of the product can be selected as the location you have previously set or after adding it)
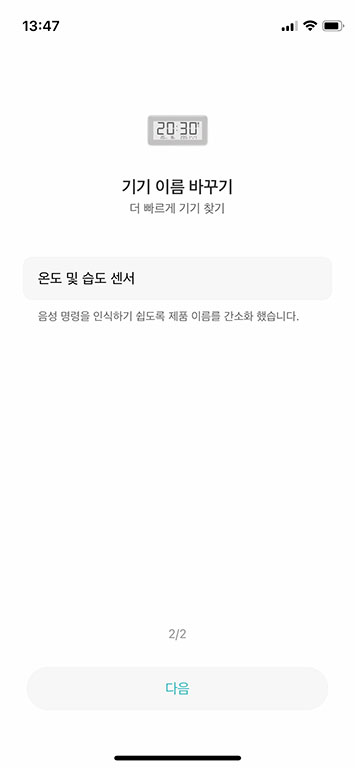
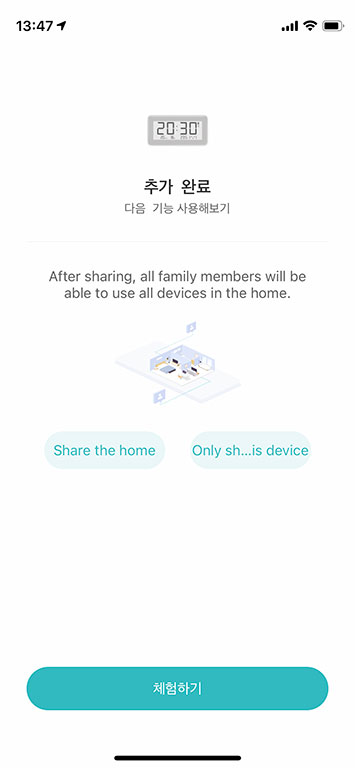
Once the location selection is complete, you can change the name of the device you want, and after the name setting process is complete, the product addition is completed.
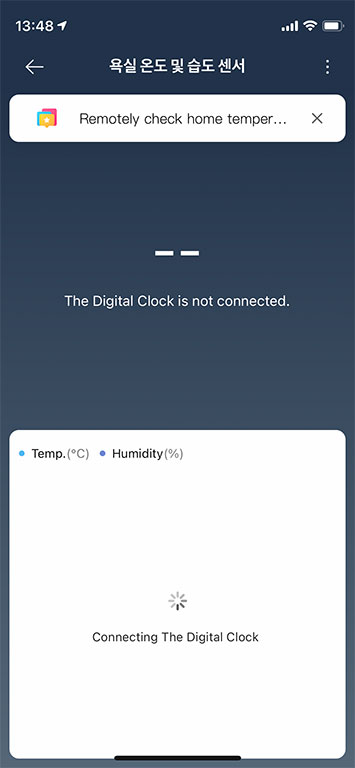
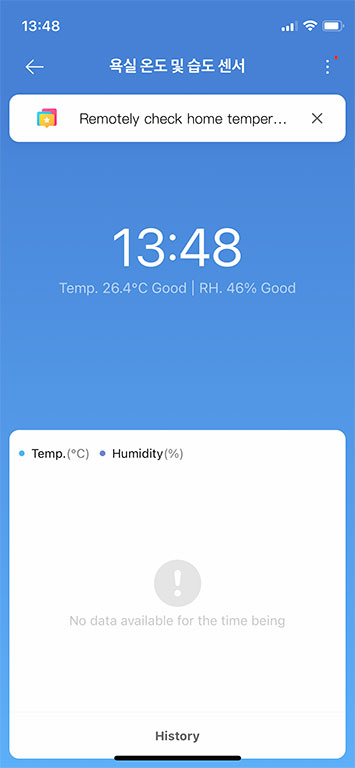
When you enter the sensor screen for the first time, the background color changes to blue after the process of synchronizing with the sensor, and the synchronized time, temperature, and humidity are displayed.
Among the settings, there is a special function called infant mode, so I tried setting that function, but after that, the measurement unit displayed on the sensor changed and it returned to its original state.
If you enter the infant mode in the settings, the Korean description explains that a notification message will be sent when the temperature and humidity for infants and children are out of range.
Functionally, when the mode is activated in the house where this product is used, it seems to be a function that can help maintain the proper temperature and humidity for infants and toddlers in the house.
However, perhaps because this product was released for the Chinese market, when this mode is activated, the humidity is expressed as a percentage, but the temperature is displayed in Fahrenheit (ºF), not Celsius (ºC).
I was looking for an option to change the temperature and humidity standards just in case, but couldn't find it.
I don't know if I don't care if it's written in Fahrenheit, but I thought it was inconvenient for me to be accustomed to being written in degrees, so I turned off the mode.
If you need to activate the infant mode by any chance, you should consider the temperature displayed in Fahrenheit and use it.

After the installation of the product is complete, turn on the Mi Home app from a distance that can be connected via Bluetooth and enter the sensor Pro screen to synchronize with the sensor, and you can check the temperature, humidity, and time of the sensor in the app as shown below.
If you use it for a long time, you can check the change of the recently changed temperature and humidity as a graph under the currently measured temperature and humidity.

After using it for about a month, I am quite satisfied.
When using an E-Ink display for the display, it has better visibility and readability compared to Sensor 2 using a normal liquid crystal display, and thanks to the display, I was able to get a more luxurious feeling.
Products that use E-Ink displays usually use CR 2032 batteries for more than one year, so this product will also be used for at least one year, so there is no need to worry about replacing batteries.
When I bought it, it was $14.54 compared to the Sensor 2, which was $5.75 based on the price, but I think it is better to use the Pro product in many ways.
If you are not burdened by the price, we recommend that you purchase the Pro product.
#xiaomi #temperature #humidity #sensor #pro #components #appearance #unboxing #reviews #샤오미 #온도 #습도 #센서 #프로 #구성품 #외관 #언박싱 #개봉기 #사용기 #사용후기


Thanks for the information!